
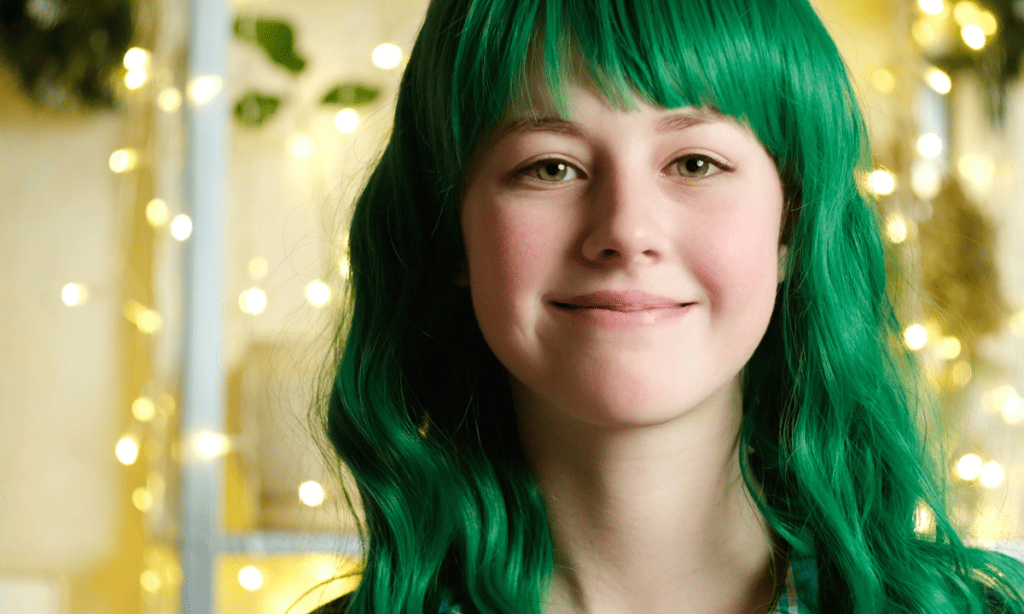
When you think of vibrant hair colors, green might not necessarily come to mind. Usually, people think of pink, purple or red, but today, I’m here to show you that green can be just as fun and that there is a shade for everyone.
There are so many gorgeous green hair ideas in this article, but my favorite look would have to be the Iridescent Greeny-Blue color.
It reminds me of the holographic nail trend that was going around a while back. Keep in mind that this look will be difficult to achieve, so I suggest going to a salon for this look. Make sure you keep up with your weekly hair treatments so your hair can show off that shine!
Green Hair Tips
Getting Prepped
Depending on the hue, you may have to bleach your hair. This is more for neon or bright green colors; if you’re doing a dark green, then having darker hair won’t be as much of an issue.
I recommend you do a patch test for the bleach first, especially if you have previously colored hair. The last thing you want is to find your hair turning a surprise color when you’ve already saturated all of your hair!
If your hair is quite brittle, you’ll want to do a hair treatment before and after the bleach; this will ensure that your hair won’t break off. Even if you’re going for a dark green color, hair treatments will give that extra bit of bounce and shine!
What Products Do You Need?
I would always recommend buying your hair dye at a beauty supply store. I’ve tried to go the cheaper route, and I can tell you that cheaper dyes can fry your strands.
Other than the dye, you’ll want to buy some gloves, a mixing bowl, a dye brush, and Vaseline.
If you’re attempting any of these looks at home, I would only recommend doing all-over color. Anything with balayage or a specified technique can go terribly if you don’t execute it properly.
I will be making note of the looks in this list that should probably not be attempted at home unless you have a professionally trained friend with you.
Products I Recommend
- Framar Classic Colouring Brush: this is a great little brush you can use to achieve some of the looks you see in this article. It has sturdy bristles and will help you get into all the precise areas.
- Salon Care Hair Colour Mixing Bowl: This is a great little mixing bowl! I have used it for many hair dye jobs over the years, and it’s held up well! It also has teeth on the edge of the bowl that helps with removing excess hair dye.
- Sephora x Wetbrush Mini Detangler: if you’re dyeing your hair at home, you need a good brush to get your tangles out before you dye it. If you dye your hair with tangles, it will come out uneven and will be very difficult to fix.
- Olaplex N.3 Hair Repair Perfector: this is a must-have if you’re dyeing your own hair. Alternatively, you can ask your salon for an Olaplex treatment if you get your hair done by a professional. You can also get Olaplex products online or at your local beauty or cosmetic store.
- Vaseline: I recommend using Vaseline to protect your forehead and around the rest of your hairline. When you’re working with green hair dye, especially dark hues, you won’t want it to stain your skin.
- Pattern Wide Tooth Comb: having a wide tooth comb will help you ensure that all of your dye has saturated your hair and that there won’t be any gaps once you’ve rinsed it. If you’re bleaching your hair though don’t brush it, as this may lead to breakage!
- Joico Colour Anti-Fade Shampoo and Conditioner: this duo is so important for keeping your green color longer lasting. Try not to wash your hair frequently. When you do, make sure to use a product like this.
The Best 15 Green Hair Ideas
Pastel Green
This first look is gorgeous! It reminds me of a tropical day. To achieve this look, you’ll have to bleach your hair first and get it to level 10, which is the highest blonde tone.
If you want to achieve this green, I recommend going to a salon for directions on bleaching your hair, and most importantly, if you have dark box dye on your hair. If you have relatively light hair, you can try a bleach bath to brighten it up a couple of shades.
When you have lightened your hair, then you can go in with a pastel green shade, which can either be mixed or used right out of the bottle. Make sure to do a treatment afterward as the bleaching will be damaging.
Dark Green With Highlights
This look reminds me of Slytherin! There is quite a lot going on in this look, so I think a salon visit for the green part would be a good idea. This is because there is a dark base green shade and then lighter green highlights.
If you’re interested in this look, keep in mind that you might have trouble reversing back to your natural hair right away. This is especially true for those who have light natural hair.
Black hair dye is quite hard to remove, but if you have naturally black hair, then you only have to worry about removing the green. If you want to create this look at home, consider skipping the highlights and opting for an all-over solid green.
Green Roots
This is another two-tone version that’s super cool! This look is easier to do at home, especially for those that have darker hair. If you have naturally dark hair, all you have to do is bleach the roots, which is easier with the heat produced from your head.
I think this look works with the shorter hair length you see in the picture. If you’re also wondering how to refresh this look, you’ll have to bleach your roots and then apply the green again.
Mermaid Green
I always imagine that this is what mermaid hair would look like! This color is at a level just under a pastel, so you’d need around level 8-10 hair to achieve this look. I would also recommend doing this in the salon, as you may have trouble blending the blue and the green shades.
If you want more green in the look, you can reverse the colors so that the top of your head is green and the bottom blue. Think of this look as almost a blonde balayage but with fantasy colors!
Iridescent Greeny-Blue
This look is super complicated-I wouldn’t advise doing this at home unless you live with a professional. This work requires a bit of technique and some good timing, so if you attempted to do this on your own, you would probably end up with a solid color look instead.
They used a highlighting technique to mix the emerald and dark blueish green. Keep in mind that a hairstyle like this is an investment and less of a one-off fun style. You’ll spend a lot of money getting back to your natural color afterward.
Green Balayage
This is a fun way to show off some green! There are many variations of this look, as you can change the green to any hue you want! If you have darker brown hair, then going for a deeper green would bring out all of the brightening features that a balayage would.
For any pre-lightening, you may wish to have a friend or stylist to help you, as the blending on a balayage would be hard to do at the back of your head.
Two Tone Green Wolf Cut
This hair is so cute! It’s a fun take on the wolf haircut trend from last summer. It looks like the stylist colored the bangs light green and the rest of the hair in a light emerald green. You could achieve this look at home, but you might want to go to the salon to have the wolf cut done, as it can be very tricky to cut your hair.
Depending on your hair color, you may only have to bleach your bang area. Everyone will have to bleach their bangs unless they have platinum-level 10 hair.
Green Mullet
This gives the mullet a cool edge! If you’ve been thinking about cutting your hair short, then the green look will give you some seriously cool vibes. A mullet cut can be achieved at home because it doesn’t rely on precise cuts with a ton of expert tools.
I would get a friend to cut it for you, though, because not even great stylists can comfortably cut the back of the hair. Make sure to go out and get some professional hair scissors, though, because that will make a difference.
Green Bangs
Green bangs are a fun way to change your look without the huge commitment. You can change up the hue depending on your current hair color. In this particular look, there is a mix of neon green, turquoise, and yellow, but any version of green would look good!
Make sure to separate your bangs from the rest of your hair carefully to get even lines.
Emerald Box Braids
This is a great way to incorporate some green without being too bold. The stylist has most likely braided in some strands of synthetic green-colored extensions to get this look. Depending on the color of your braids, you might want to switch to a lighter shade of green.
I think that the Emerald color would look good with any hair shade. If you already know how to do braids on your own hair, then all you’ll need to pick up is some extensions. If you haven’t braided your hair before, I would recommend seeing a professional to help you recreate this look.
Green Hair Wraps
This hairstyle doesn’t require dyeing, so if you have hair commitment issues, then this would be a great option. Most people use wraps specifically for hair, but you could also use embroidery string. There are so many places that carry the supplies that you would need to create this look at home.
It will take quite a while if you’re looking to do multiple pieces, so you can opt to do one or two a day if that makes it easier. If you have fragile strands, though, I wouldn’t recommend this look.
Emerald Highlights
This is another great way to incorporate some green into your hair without the huge color commitment! You will probably want a stylist to do this look for you, as highlights do require skilled hands. I think this look would be perfect for Fall or Winter.
The other great thing about this look is that you can let your roots grow for longer, which means less time and money at the salon!
Neon Green
This is a show-stopping look! You’ll want to recreate this hair if you’re already into vibrant colors. You can do a lot of damage to your hair when trying to recreate this look.
You’ll need to achieve a level 10 blonde before applying the neon dye. Keep in mind that green is very difficult to remove, so think long and hard before diving in.
Green Fade
This is a great hairstyle if you are already a fan of the fade. You will need to lighten your hair to about a level 8 or 9 at home before applying the green dye.
If you don’t want to permanently dye your hair, you can always use semi-permanent or temporary color gel. In terms of the haircut, I would recommend going to a barber so that the fade looks well blended.
Neon Box Braids
This look is for those who love braids and who want a brighter option than emerald. The technique would be the same, but instead, you’d be swapping out the extensions for neon green.
It would even look cool if you had a mixture of emerald and neon green braids. Again, if you’ve never braided your hair, I’d recommend going to a professional. Make sure to ask them beforehand if they need you to bring the green extensions with you.
FAQs
Answer: I like the Wella Powder Lightener Tub. You get one pound of product that will last you forever! It provides up to 7 levels of lift, so if you have darker hair, it will speed the bleaching process up!
Make sure to read the instructions on whatever bleach powder product you pick up. If you watch some bleaching videos online as well, that will help you master the process. I love this video by Brad Mondo-he guides you through all things at home dyeing.
Answer: The answer depends on what kind of dye job you are trying to achieve. If you’re doing an all-over color, you can get away with doing it at home if you have hair that reacts well to dye and doesn’t have too many colors underneath.
A salon will almost always be able to help you achieve the look you’re going for. The only downside to a salon is that it can be expensive for difficult dye jobs. However, spending a little more to ensure a good outcome does outweigh a hair disaster at home.
Answer: Absolutely not! Brushing your hair while there’s active bleach can result in breakage and damage. Your hair is in its most vulnerable state when it’s bleaching.
To ensure that you don’t get any knots when you’re bleaching, brush your hair beforehand and section the hair as you bleach so that it stays separate. Another tip: make sure you oversaturate your hair with bleach. You want to have a lot on there so that it can penetrate each strand.
Bottomline
Green hair is an awesome way to express your personality. There are so many options to choose from, but I hope this list helped gives you the breakdown of some of the most interesting and inspiring looks.
Keep in mind that while some looks can be achieved at home, a salon would be a good option for more complex ones.
My favorite look from the list would have to be the iridescent greeny-blue color. It has many different elements that come together to create this mysterious darker look. As I said in the list, this look should be achieved at a salon.
Remember that any colorful hair look will have quite a bit of upkeep, so be prepared to spend more money after the initial appointment. However, it won’t be as much as with the first appointment.
Make sure you have salon-quality color protectant products, and don’t wash your hair too frequently; this can lead to fading quite quickly.
Looking for more interesting readings? Check out:
- How to Find the Best Green Hair Dye: Which At-Home Funky Dye Should You Choose?
- How to Find the Best Emerald Green Hair Dye: Get This Trendy Hair Color
- How to Find the Best Neon Green Hair Dye and How to Do It
- 15 Best Green Hair Ideas To Rock This New Year - January 12, 2023