

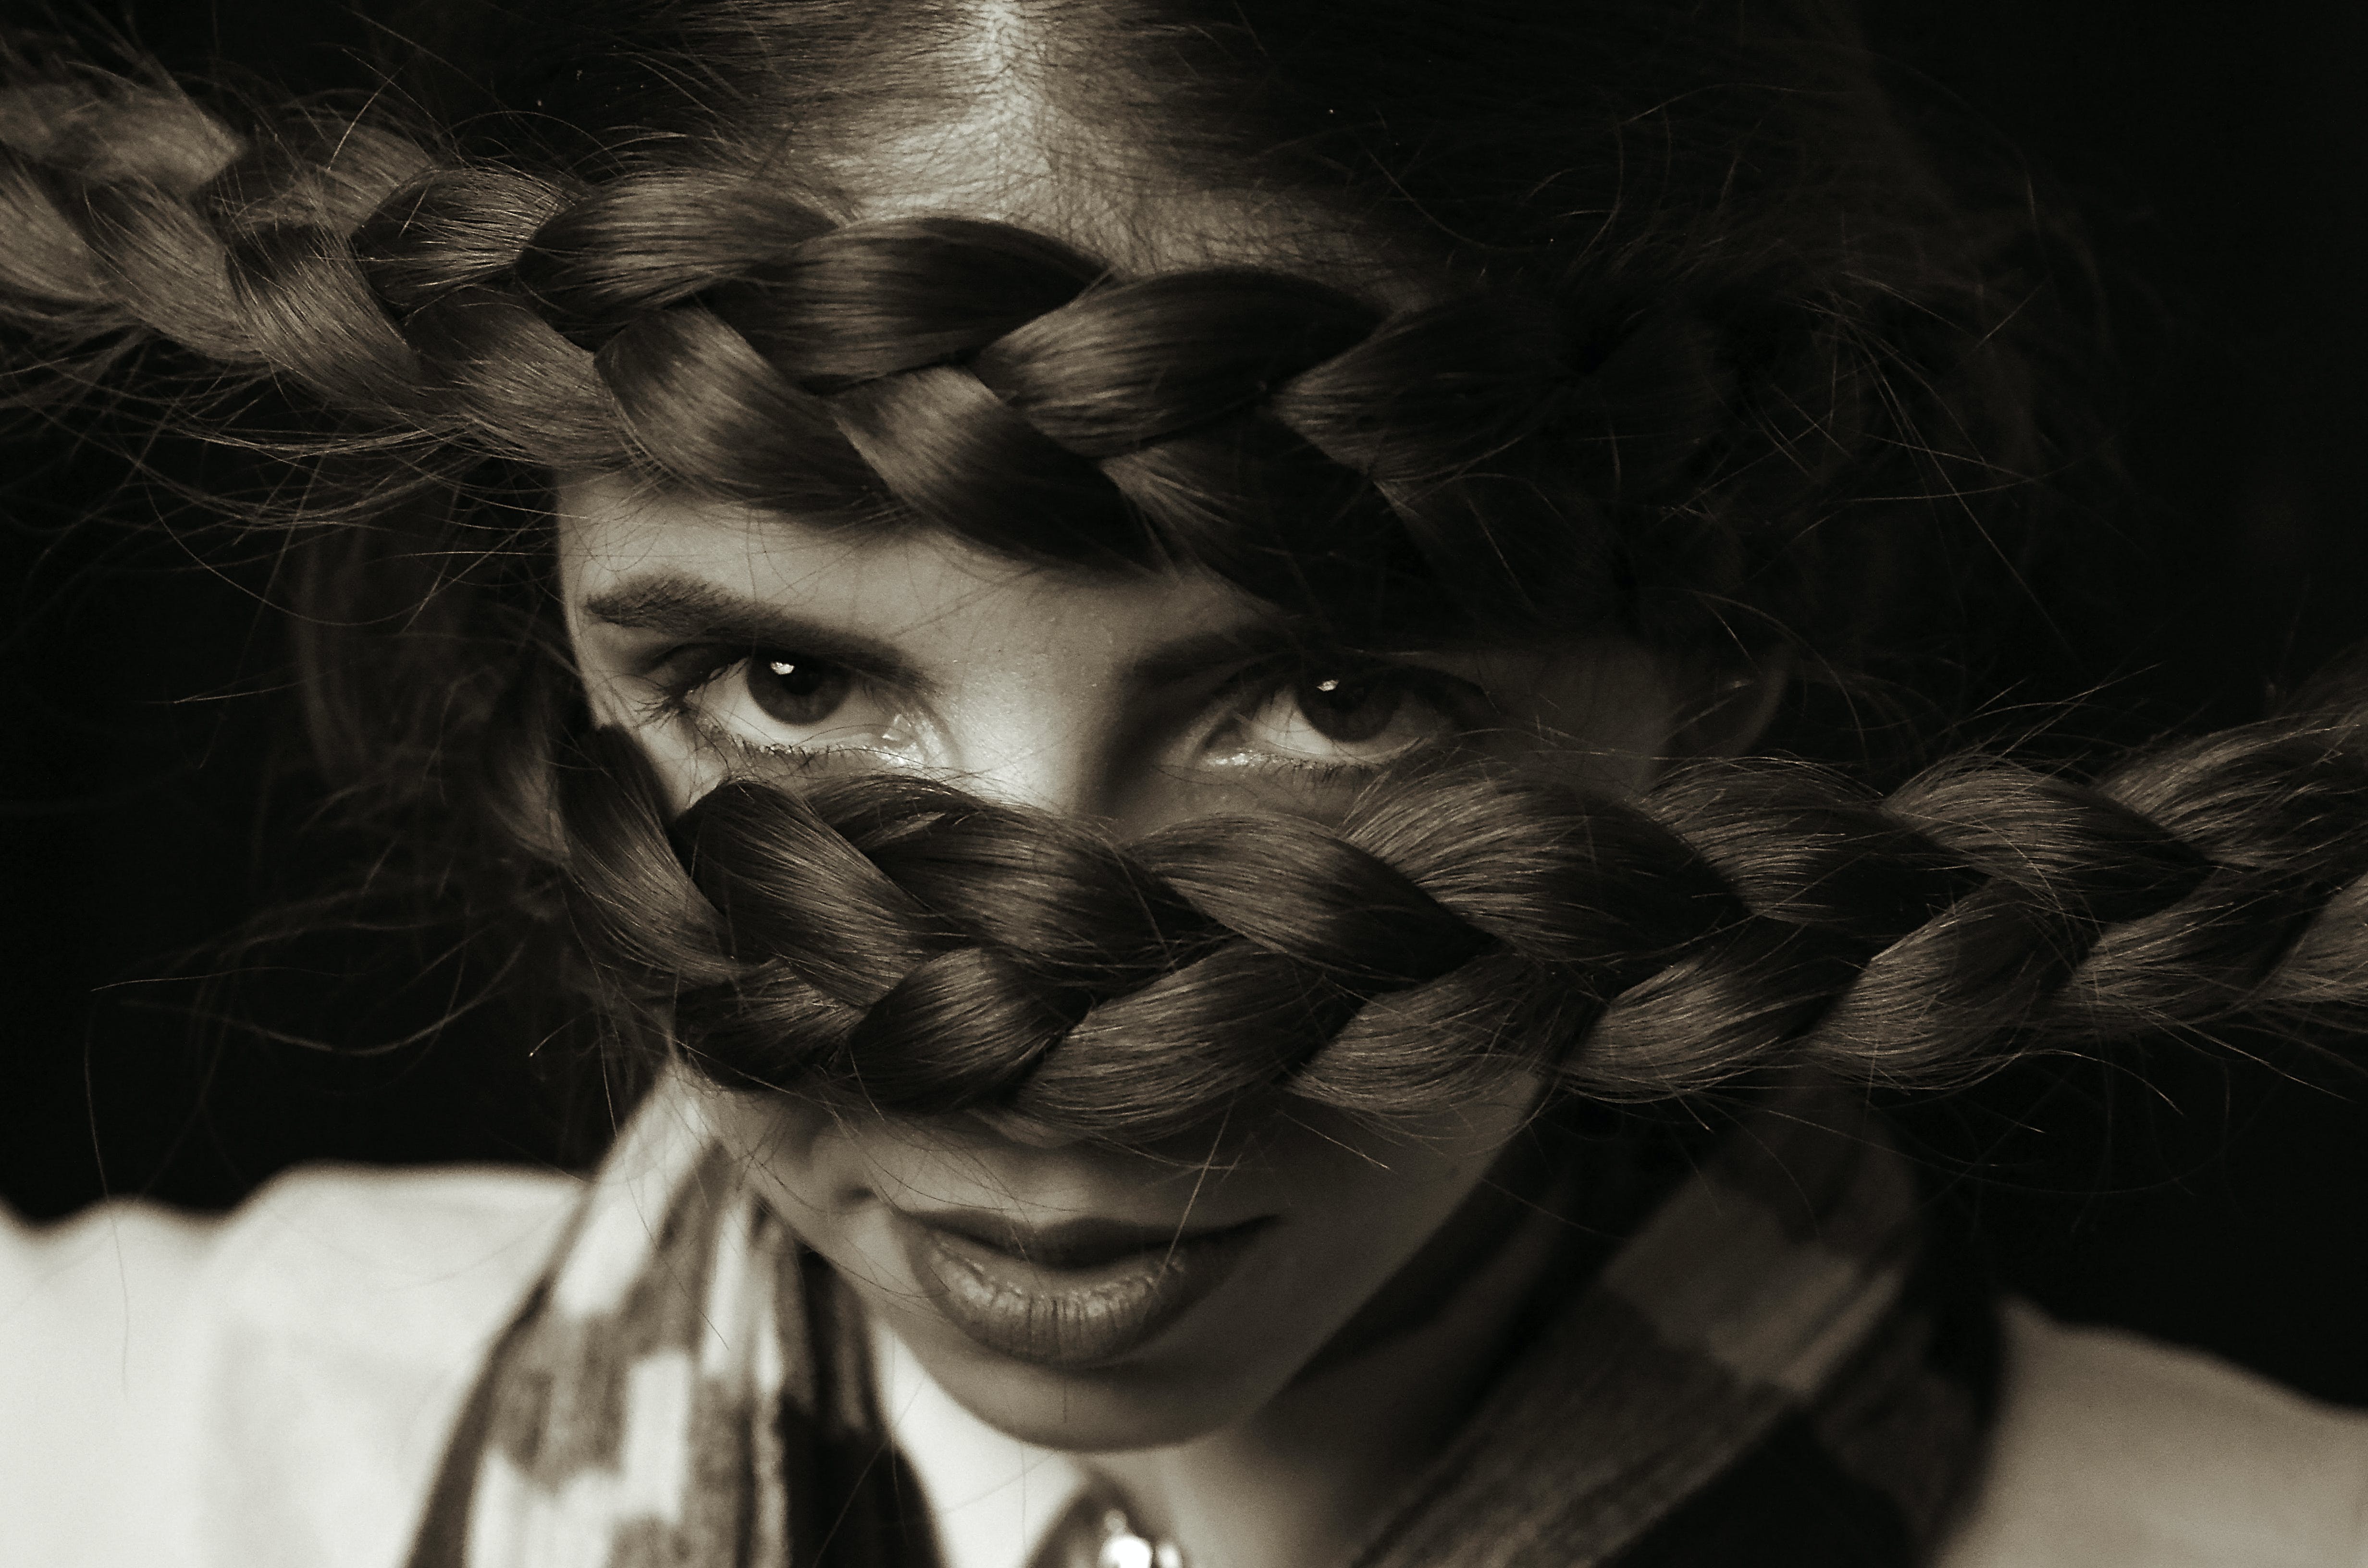
Braiding hair is a form of art that’s been around for ages. Doing simple braids is easy, but mixing things up gets complicated. Despite this old hair-styling art, braids have never become outdated. Instead, they can look stylish and feminine based on their type.
I love braiding my friends’ hair, especially those with longer strands. I had long hair as a child, but unfortunately, my mom didn’t really know how to braid it.
Below, you’ll find all sorts of braids, from the simplest to the most complex types. So enjoy, and don’t forget to try these hairstyles and see whichever suits you the best.
Bottom Line Up Front!
Braiding looks lovely if you know how to do it. Unfortunately for me, my hair is fine, thin, and straight. That means it’s hard to braid because it’s too silky and slippery. On the other hand, if you have wavy or curly locks, you should totally try braids because your hair comes with boosted texture and grip.
If you braid your locks to achieve wavy hair like I tried countless times, you should learn from my experience and mistakes: do them as tight as possible; apply strong-hold hairspray on them; if you plan to leave the braids overnight, you should protect them with a silk scarf.
In my experience, freshly-washed locks are too slippery and silky, so they don’t braid nicely. It’s better to wait a day before braiding your tresses.
I used to think that only long hair could be braided, but short locks can also be styled like that. You could use hair pomade to avoid frizz or flyaways, although I’m a bit afraid it might make my strands a bit greasy.
I’ve also recently learned that my medium-length, layered hair can display some beautiful braids as long as I use a lot of holding spray.
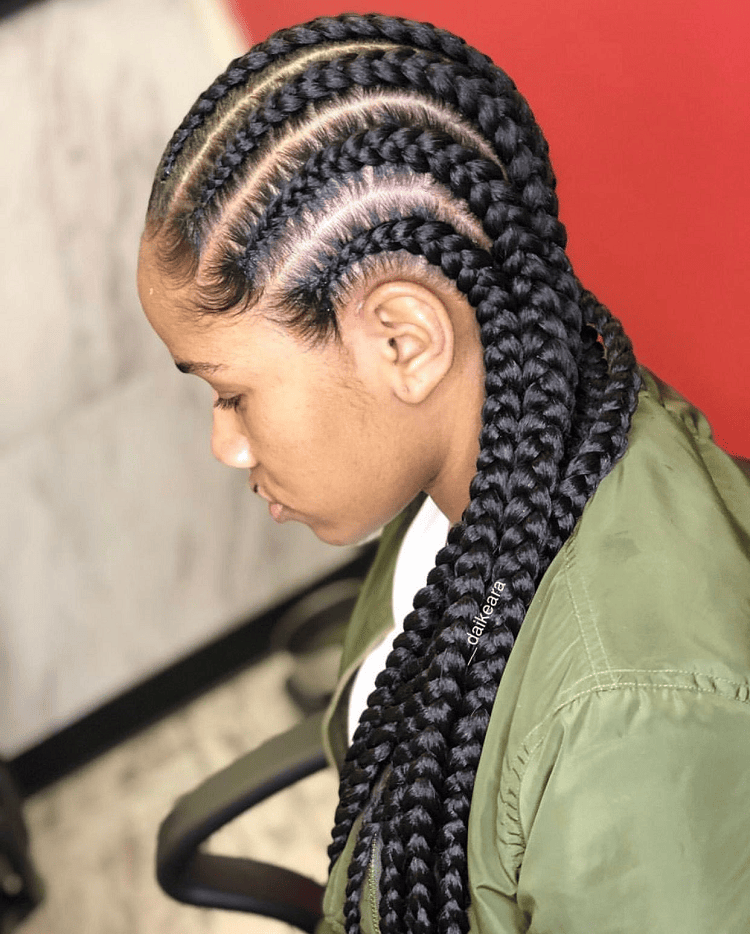
Finally, those with coarse or kinky locks use braids as a protective method. If they maintain their braids properly, that hairstyle can remain fresh and unspoiled for up to twelve weeks.
Source: Pexels
Types of Braids Guide – Top 12 Options & How to Do Them
There are numerous braid types, from the simplest and most basic ones to complex and intricate patterns. I bet you’ll be dazzled by all the braid types I’ve detailed below.
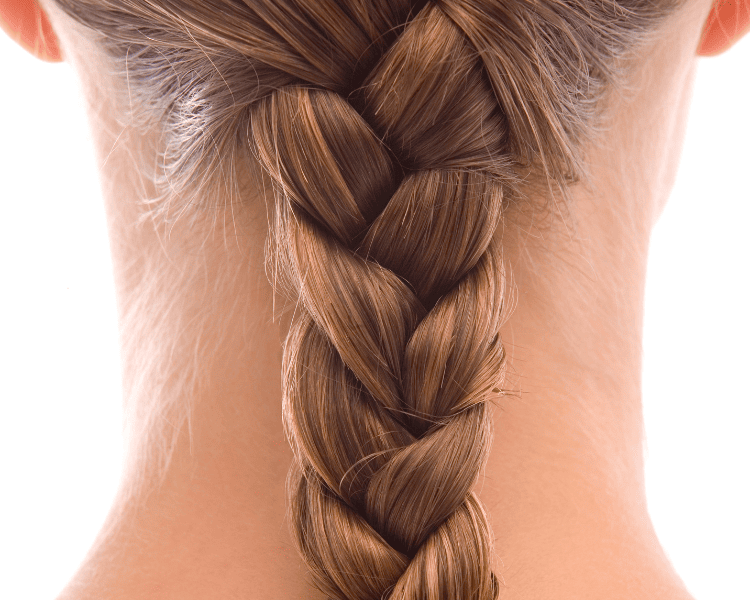
The Basic Three-Strand Braids
The Story Behind the Braid
This is the simplest braid to do. You can even do it yourself, on your hair. Many girls used to wear it back in my childhood. My favorite, however, were pigtails. These are made the same, but you must split your hair into two equal parts, and instead of one braid in the back of your head, you’ll have two, one on each side.
If you learn how to properly adjust this braid’s texture, thickness, and size, you’ll achieve a wide range of pretty hairstyles.
How to Style
Even though it’s very easy to do this braid, you still need a few tools:
- One hair elastic, preferably one that has a color similar to your hair shade;
- A comb or a hairbrush.
I usually start by detangling my hair carefully while avoiding breakage. I then split my locks into three equal parts – this is the tricky phase because my hair is layered. Then, it’s time to flip each lock on top of the other, starting from either the left or the right part that goes on top of the middle lock.
I do that until I reach the end of my hair length and secure the braid with the hair elastic. I like to do this braid right after I wash my hair because it helps me achieve a wavy hairstyle.
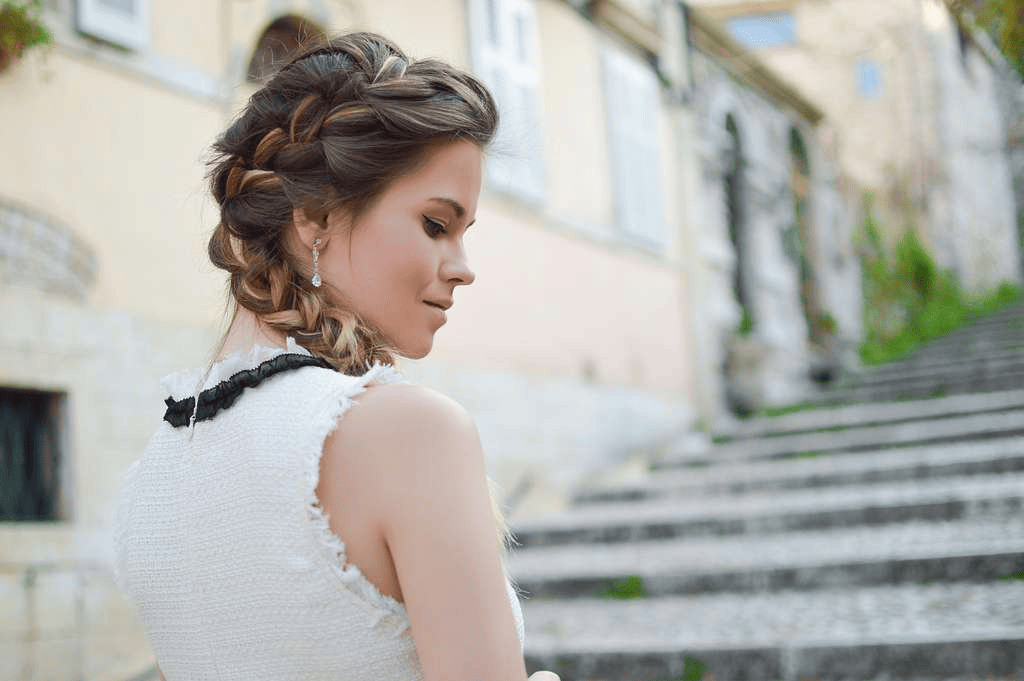
French Braid
The Story Behind the Braid
French braids are similar to three-part braids, but you must plait your locks together this time. Also, on each rotation, you should include a new hair section from each side of your head.
I love this braid since it looks so chic, elegant, feminine, and versatile. I could wear this hairstyle at a formal event with a classy dress or pair it with a breezy and casual summer outfit.
How to Style
You can do a French braid on the back of your hair, starting from your head’s crown to the ends of your locks. Or, you could create this braid type on one side and pin it up to create a stylish updo.
At first, I found this braid a bit hard to do, but as soon as I got the hang of it, this hairstyle only took about five minutes to complete.
Once again, all you need is a comb and hair elastic. First, make sure your hair is knot-free using a brush or comb. Next, select the upper front part of your hair, the one in between your temples, and split it into three equal sections.
Next, braid that section following the guidelines mentioned above for the three-strand braid, and as you come down your hair length, start adding parts of your loose hair from both sides.
I enjoy wearing this braid as loose as possible to create the illusion of boosted volume.
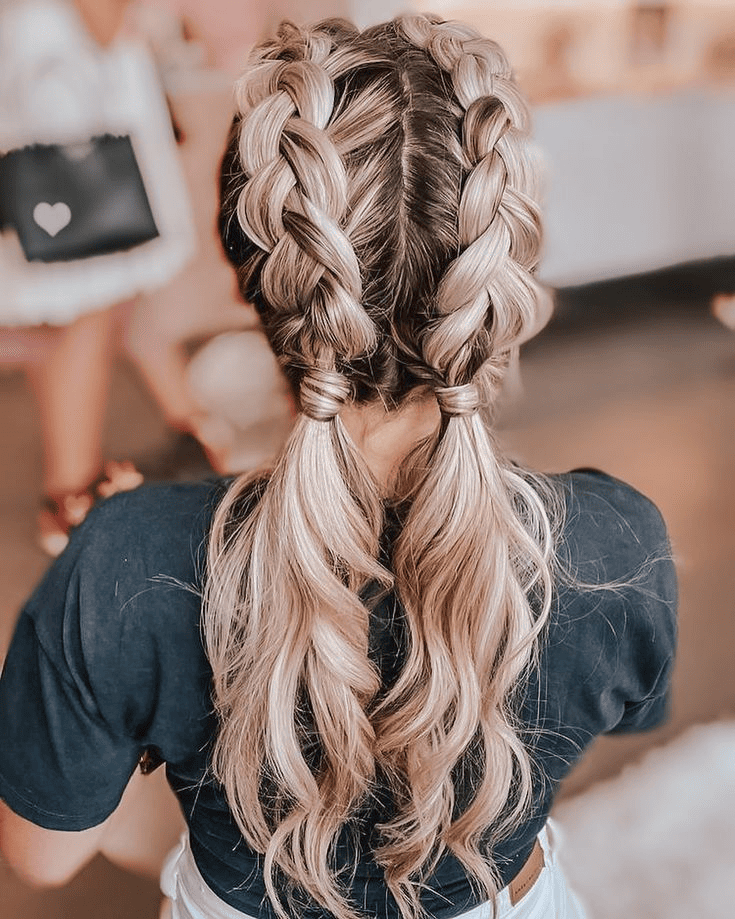
Dutch Braids
The Story Behind the Braid
If you’re wondering what Dutch braids are, you should know they’re just like French braids, but you must do them in reverse this time. Don’t confuse these with upside-down braids. Dutch braids are also called reversed French braids.
They look very snug, which makes many female boxers love them. They were all the rave in the 1990s, especially among Hollywood celebrities.
These hair braids are a classier and more complex alternative to regular pigtails. But you can also create a Dutch braid on the back of your head.
How to Style
Unlike French braids, you must place the side parts underneath the middle hair section this time.
Next, you must braid your hair by placing each side section under the middle part, starting at the head’s crown and including gradually more hair as you braid down to the ends. Finally, continue braiding from your neck down and secure the braid with the elastic.
Fishtail Braids
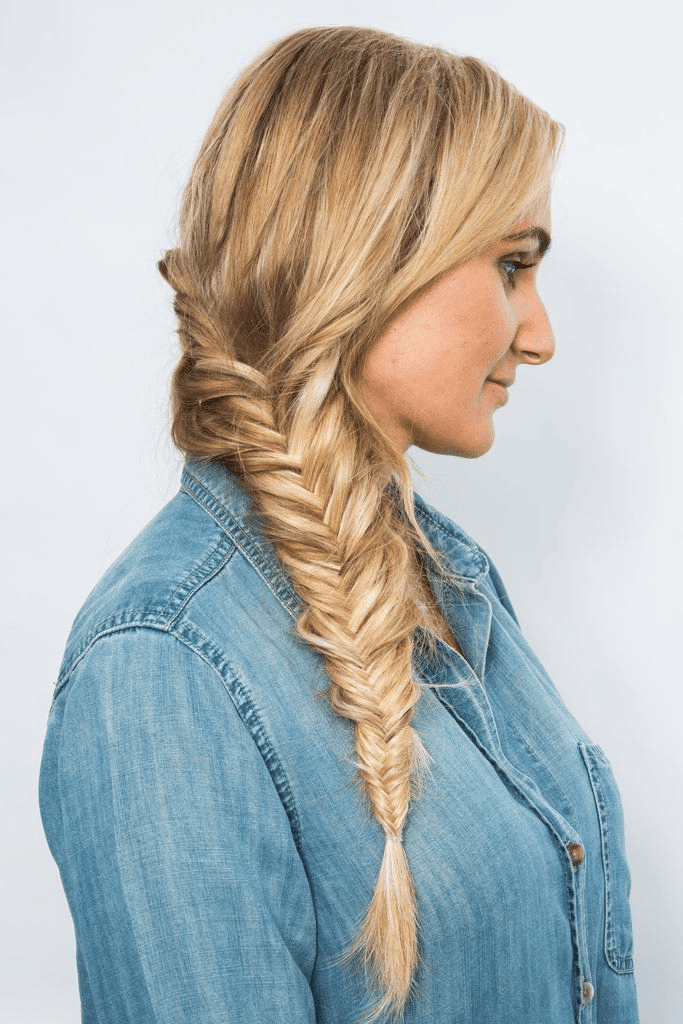
The Story Behind the Braid
Fishtail braids look exquisite and suitable for a wide range of occasions. At first, I thought this type of braid was quite playful, cheeky, and unexpected as a possible hairstyle.
It resembles a fish’s tail or the image you would see if you looked at yourself in a mirror. You can place it on the back or do it on one side so that you can show it from the front, on one of your shoulders.
I would choose a volumized alternative, with loose hair strands to frame my face.
How to Style
This is a more intricate braid type that looks fancy, and it’s an excellent option for special events. You’ll need two hair elastics and a comb or hairbrush this time.
Once your locks are entangled, use one of the elastics to gather all your hair in a low ponytail. Next, split your hair into two sections, and then each section into thinner strands.
Each thin hair section from the outer side on your left must come over the right section’s inner side. Do the same for the other part – bring sections from right to left.
Repeat this process all the way down to your hair’s ends. Secure the braid with the second elastic. I would eliminate the first elastic, the one placed at the top of the braid, to complete the hairstyle. Just cut it off using a pair of scissors.
Mermaid Braid
The Story Behind the Braid
I must confess that this braid type has nothing to do with actual mythologic mermaids. It’s very similar to a French braid if you were to do it in a lazy and relaxed kind of way. It’s not as tight and anchored to one’s head as many other braids.
How to Style
You can start this hairstyle as you would do with a French braid but immediately switch to the basic three-part braid if all you want are three chain links. Then, as you work your hair downward, you can add a few more thin locks and include them in this hairdo.
Or, if you want something more complex, you could try to recreate the Mermaid braid featured in the photo above.
Milkmaid Braid
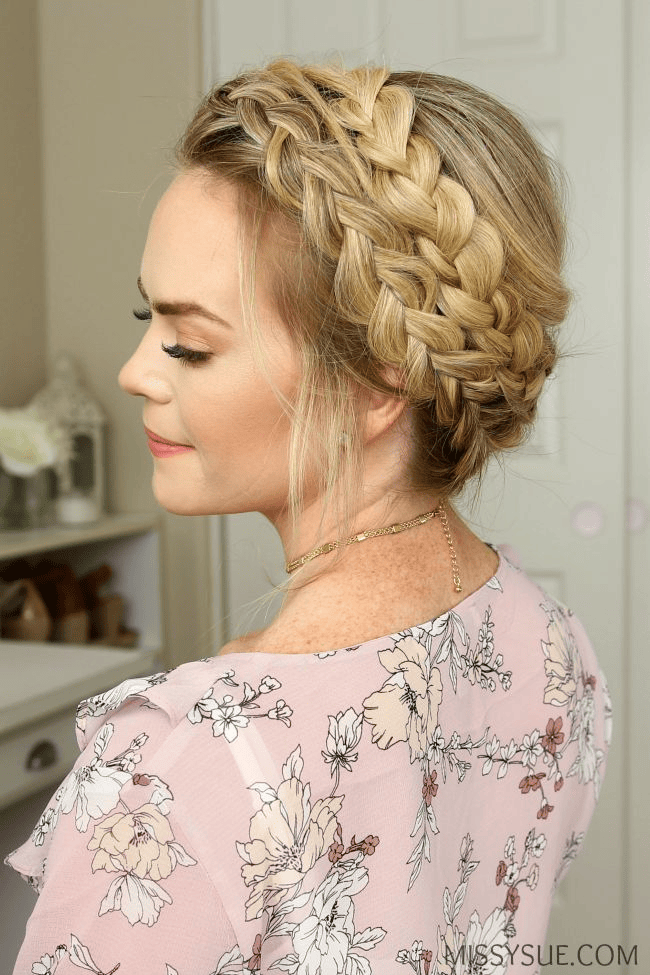
The Story Behind the Braid
I find this braid very feminine and rustic. It’s great for a rustic barn-based type of wedding or event. I could also opt for the Milkmaid braid during a mother-daughter photoshoot. It resembles the crown braid, but it’s featured far back on top of your head’s crown instead of your forehead.
How to Style
Milkmaid braids go wonderfully with bangs. I usually start by doing two pigtails, one on each side, and then pin each pigtail up on the top of my head.
You’ll need several tools to perform this hairstyle: a brush, a couple of hairpins, two hair elastics, and a comb with a thin and long rat-tail handle (the last tool helps you divide your hair into thinner sections).
Each pigtail features a simple three-strand braid. Use the hairpins to tuck away your loose hair ends for a sleeker look.
Four-Strand Braids
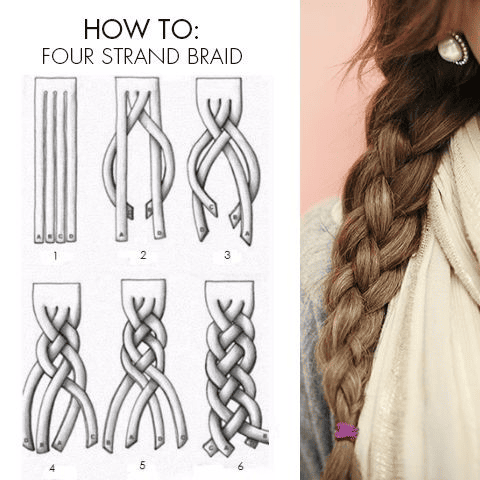
The Story Behind the Braid
If you want to take braiding to the next level and shake things up a bit, you could try this four-strand braid. It’s a classic braid with a twist that will certainly attract everyone’s attention. You can wear it anywhere you want, from casual meetings to office, classroom, and cocktail daytime events.
How to Style
To do this braid, you must remember the following sequence: over, under, and over again. Unlike the three-strand braid, this hairstyle requires you to split your locks into four equal sections.
Then, you can either use a hairbrush or a thin comb. If you’ve never done this braid before, it’s easier to do it on one side so that you can see your locks while looking in the mirror.
It helps if you give numbers from one to four to each strand. That way, you can follow my guidelines a lot easier: both one and four are the outer sections; flip the first section on top of the second hair strand and under the third section.
Finally, continue with that first strand under the last section, the fourth one. Tighten your hair as much as possible. Otherwise, it may slip. Do the same with the outer section on the other side, and continue until you finish braiding all your tresses.
Crown or Halo Braid
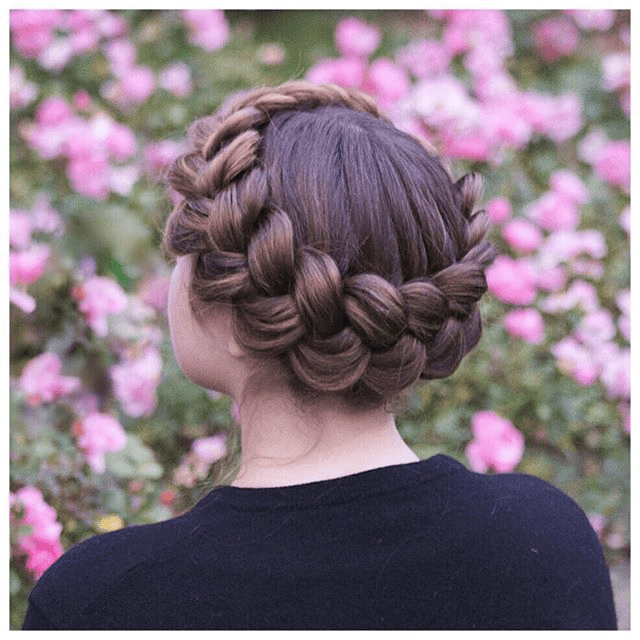
The Story Behind the Braid
Halo or crown braids are the more angelic, almost noble, or royal alternative to milkmaid braids. By comparison, halos are placed lower down your head, near your forehead; they sometimes cover the upper part of your forehead. If you’re about to be a chic boho bride, then this braid type is the perfect hairstyle choice.
I would personally opt for some loose hair strands in the front to frame my face, which means I would place the halo right above my forehead, leaving it free and uncovered.
How to Style
Trust me when I say this hairstyle isn’t as tricky or time-consuming as it seems. It’s just like a French braid, but you must pin it up to create a round shape that wraps your head from one side to the other.
I usually do a side braid which I wrap around the top part of the head, above my forehead. I insert bobby pins along the way to ensure it stays fixed all day.
Micro Braids

The Story Behind the Braid
Micro braids resemble box braids because they are based on the same braiding technique. However, micro braids are thinner and smaller than box braids. This style, although chic, isn’t for everyone. It must come with a certain attitude.
How to Style
It’s hard to do micro braids if you haven’t done them before. But, if you’re courageous enough to try, you’ll need a thin comb for sectioning hair and patiently work those tiny hair sections one by one.
Since an image (in this case, a video tutorial) speaks more than a thousand words, here’s an example of how you can create this chic and relaxed look.
Cornrow Braids
The Story Behind the Braid
Like corn rows on a field, these braids form parallel lines across your head with spaces between them. They’re very tight and start from the front, ending towards your hair’s tips. You can leave the loose part as it is on your back, or you can play with it by creating all sorts of ponytails, updos, and buns.
How to Style
This is another protective hairstyle for coarse and coily locks. These braids are a bit easier to do than micro braids since they’re thicker. First, your hair should be freshly-washed and completely detangled.
Next, part your locks into numerous sections (preferably equal parts), starting from the front part of your head. Each row will become a classic three-strand braid.
Again, I’ll add a tutorial as a visual aid to help you do these braids at home.
Waterfall Braids

The Story Behind the Braid
If you want a braided hairstyle that looks elegant yet feminine and delicate, you should try this charming alternative. Waterfall braids are still trendy among young brides and bridesmaids.
Also, many girls wish to wear this gorgeous look at their proms. You can master this stunning hairstyle if you follow the guidelines mentioned below.
How to Style
You won’t need elastics for this braided hairstyle, but keep a hairbrush and some hairpins close by. First, detangle your hair and part it on one side before grabbing a smaller hair section of about three inches from the front part.
Then, divide that small section into three equal parts while keeping in mind that the top section is the one that’s closest to your head’s crown.
Then, the middle section and the lower one follow. Finally, you’ll create the waterfall effect by flipping a new tiny hair section over the central strand, but not before doing a classic three-strand braid at the top for the first layer. Being a complex braiding style, I will once again attach a video tutorial that works as a DIY guide.
Rope Braid
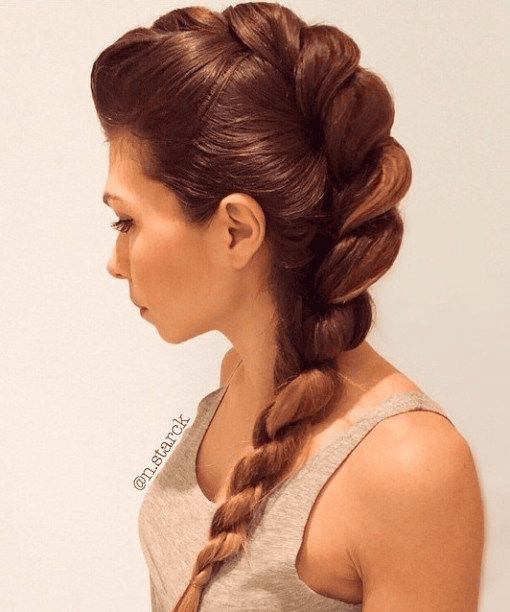
The Story Behind the Braid
You can do rope braids in several ways, but my favorite is the one featured above that also mimics a mohawk. So, this is the ideal rope braid for my taste, the one with the faux mohawk, because it adds volume and height to my head’s crown. But you can also opt for rope pigtails or more complex alternatives.
How to Style
This braid is both elegant and chic yet cool and modern. In addition, rope braids are more accessible than other braid types.
The most popular rope hairstyle is the twisted braid. It requires you to split your hair into two equal sections and twist each section individually.
If it helps, you can tie your whole hair in a ponytail and then remove the elastic. Next, follow the clockwise direction for the twist and intertwine these two hair sections in the opposite (anticlockwise) direction.
Finally, when you’re done, you can secure your rope braid with a hair elastic.
The Best Styling Products for Braiding Hair
Certain hair care products could improve your braiding outcome, especially if your hair is layered with lots of flyaways or is too frizzy. Here are my favorite styling products to use for braids.
Gold Series Braid Cream by Pantene
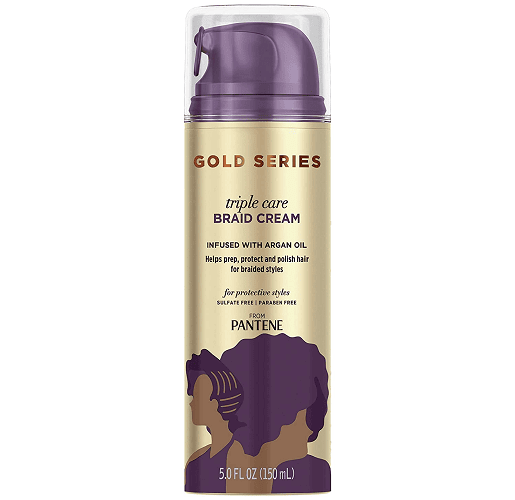
This hair moisturizer provides tripe care because it also boosts your locks’ texture while releasing your scalp’s tension from all the braiding you did. In addition, Pantene braid cream is highly moisturizing due to its argan oil and vitamin formulation, which means your hair will not become dry or easily breakable.
Pro
- Moisturizing and shiny finish.
Con
- A powerful scent that could be overwhelming to some.
Kuza Beeswax Braid Conditioner
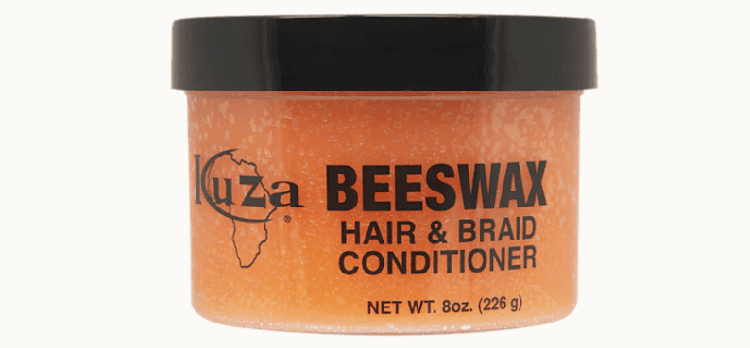
Not only will this product moisturize your hair strands, but it will also offer fantastic hold. It’s long-lasting and helps you braid and style your tresses much easier.
If your textured hair is stressed and dry, this Kuza conditioner is ideal for your needs since it restores moisture and supplies your hair with essential fats. Moreover, it doesn’t leave any residue on your scalp.
Pro
- It contains natural and wonderful ingredients, including Paraffin wax and beeswax.
Con
- It’s formulated with mineral oil which can be seen as a downside.
Jamaican Castor Oil by Shea Moisture
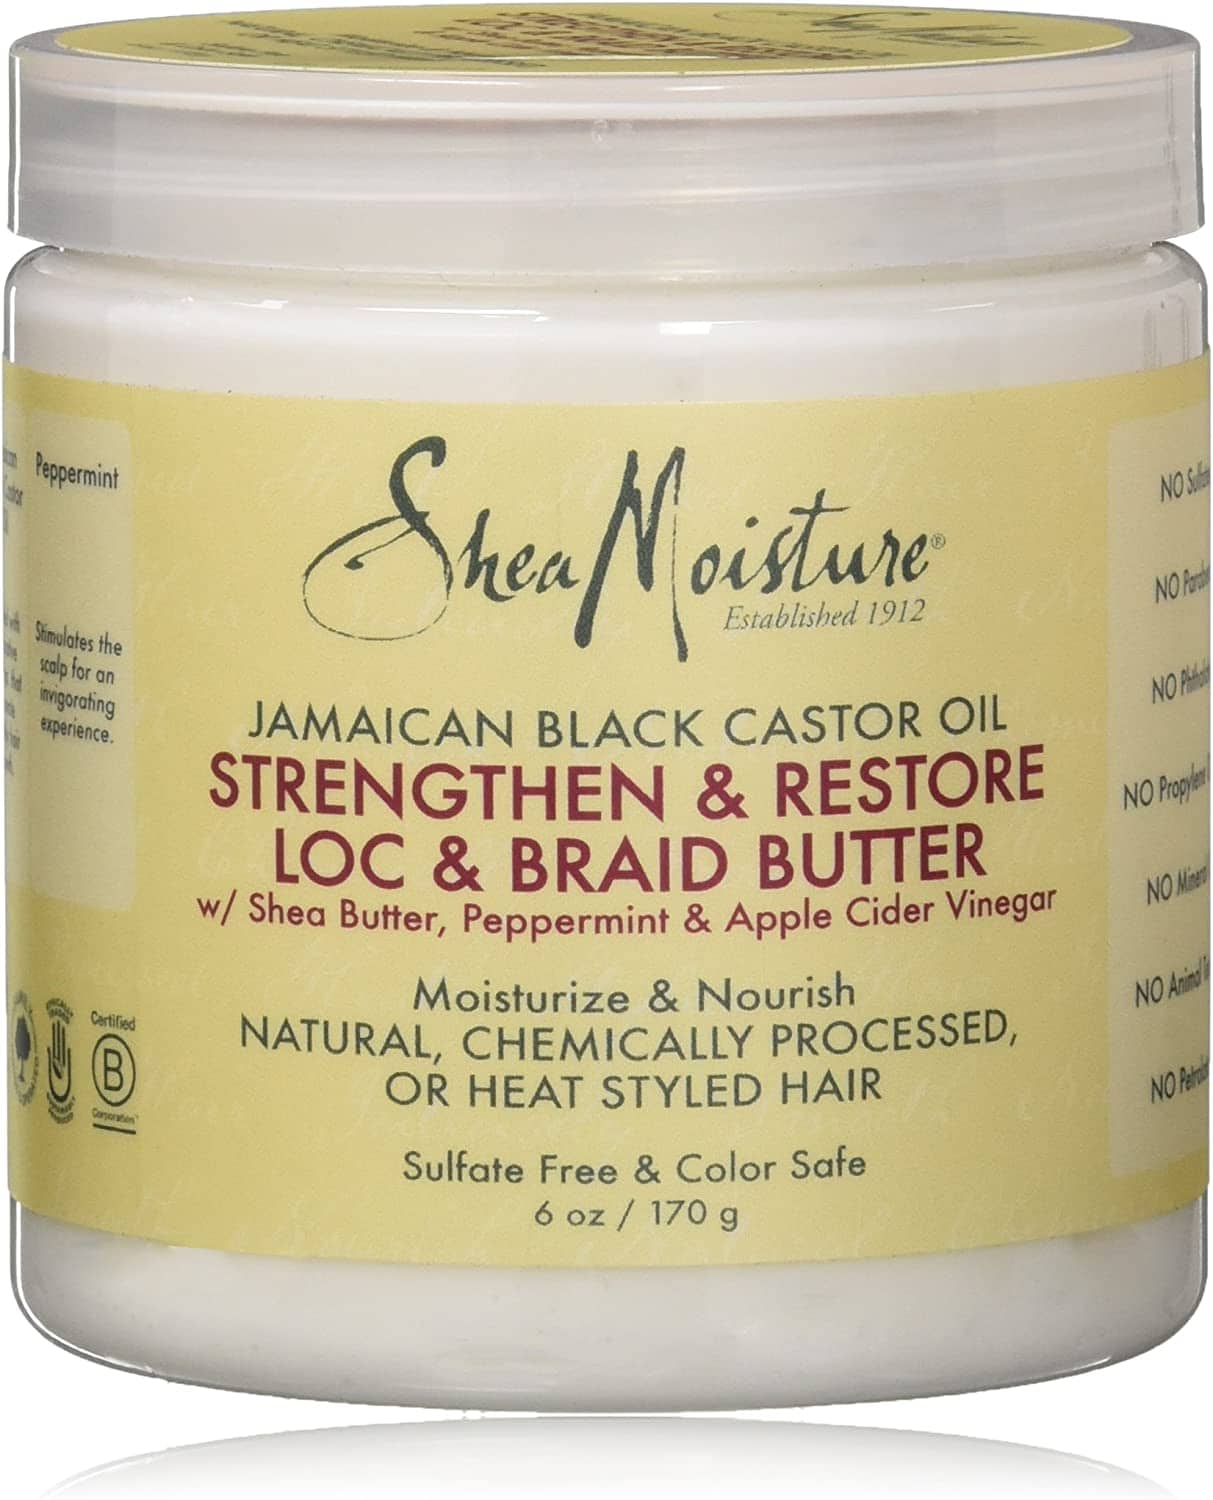
I love many Shea Moisture products. They’re so effective on a wide range of hair types. This SheaMoisture hair butter is moisturizing and nourishing.
It’s formulated with effective ingredients like Shea butter, apple cider vinegar, and peppermint for a cool and refreshing sensation. Moreover, it’s sulfate-free and suitable for natural and colored hair.
Pro
- A vegan formula that detangles your hair and adds shine.
Con
- More expensive than other options.
Types of Braids Guide – FAQs
Answer: Yes, you can, regardless of how short or long your bangs are. You can braid your locks while leaving your bangs loose or the other way around. Longer bangs can be braided on one side, while shorter ones can become part of a crown braid hairstyle. In addition, you can opt for a French braid fringe or side-swept bangs.
Answer: Box braids are all the rage for afro-texture locks. Dutch and French braids are also very popular and look charming and feminine. Fishtail braids are also beautiful choices for boho brides. The ultimate trend among braids fans is the feed-in braids which are basically cornrows created with hair extensions.
Answer: Knotless braids are known to last about three months or so. But that varies based on your hair’s texture, as well as its porosity.
A knotless braid starts with your hair strands that might be short and then continues with a hair extension that you add to your natural strand’s length. They are another type of protective braiding style.
- Redken All Soft vs. Extreme – Which Shampoo Worked Better for My Hair’s Needs? - August 4, 2023
- Types of Braids Guide – Top 12 Styles, How to Do Them & Best Products for Braided Hair - November 30, 2022
- Best Blow Dryer with Comb Guide – My Top 9 Options of Hair Dryers with Comb Attachments & How to Choose One - November 23, 2022